Image and video hosting by TinyPic Image and video hosting by TinyPic Image and video hosting by TinyPic
Showing posts with label tutorial. Show all posts

Friday, September 2, 2011

Ruffled Lamp DIY Tutorial - Pinterest Challenge!


Have you heard of the Pinterest Challenge? If you love Pinterest, and creating new things, it's a great way to get you motivated! I decided to take the challenge myself, and turn a boring simple lamp into a beautiful ruffled lampshade.

Using this inspiration:

 I will show you how to turn this:

Into this!

For under $15!

It takes under an hour, and is so simple! I promise :)

See how to do it after the jump!

Thursday, July 14, 2011

Harry Potter!

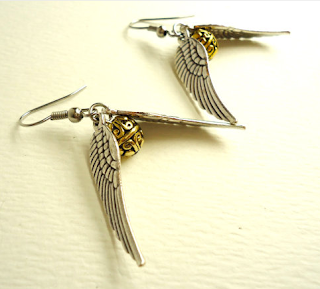
I'm in love with Harry Potter. Love is an understatement actually. I have been reading them since they came out, and I remember being so young, but yet loving the challenge of reading a much harder book. I have grown up with the series, and have always gone to midnight screenings of the movies, and would get the books at mignight. I would stay up and read the book cover to cover once I got it, and I have read the whole series easily over 50 times. I re read the series at least once a year. So yeah, I'm kind of obsessed. And to celebrate the last movie (which I know will make me cry), I found some great Harry Potter items!

Can't wait for the movie tonight at midnight!


Here is my shirt I made in 8th grade for one of the movie premiers. I am a Slytherin girl, I love my Draco :)


Click on the picture to see the item for sale!


Here are some cute cupcakes from the blog Cupcakes Take The Cake. Arn't they fabulous! And I bet delicious! They're from the bakery PJ's Baby Cakes


Here is this AMAZINGLY awesome nail tutorial from one of my favorite sites, beautylish. They have amazing makeup, hair and nail tutorials. Here is the link!


Here is the outfit from today! Yesterday was the 9 hour drive from Georgia to Virginia, so no outfit.


Behind me is my dad's magnolia tree. One of my favorite flowers!


This is when Mutlee ran into the yard haha.


My baby girl :)


My dad wanted to be on my blog, hehe, I'm not sure if he even knows what a blog is!


Anyone else going to see Harry Potter at midnight?


Tuesday, July 5, 2011

Day Four And Makeup Tutorial

I love makeup, and learning new makeup tricks! One blog that shows great tutorials Ali Grace's blog! She always makes her tutorials really easy to understand, and includes pictures with each step. One that I absolutely love is natural bronze look, perfect for summer! Here is a link to it!


Here is look number four! It's the first time I've worn these black shorts! Still had the tag on them haha. 


I also wen't to the mall, and got a few items, and I know I shouldn't be buying anything, but Old Navy was having a huge clearance sale! I saved 75% off of everything, and got 4 things for under $30!

All of these cute tops were $3.73 each!

    
I also got this fabulous deep V neck romper for $8.75 (originally $35). I normally look awful in rompers (I am super short. Like under 5 feet short) And rompers normally make me look wide and short. But the deep V neck in this one, and a drawstring waist makes it look like two separate pieces, and elongates my body. Always a plus!


Did you guys find any great after 4th of July sales?


Monday, July 4, 2011

Meow Monday/ 30 for 30

I wasn't able to post yesterday because I was in the car all day driving from Ohio to Virginia, but it feels so good to be home! I like Ohio, don't get me wrong, but living right outside of DC is amazing, and there is so much to do!

My dad is looking to get a dog, he loves them and has two cat's already but has been wanting a dog for years. So tomorrow my boyfriend and I are going to look at some local pounds and shelters, and see what is out there. He wants a small to medium dog, that will get along with the cats. Hopefully we'll find some potentials! Do you guy's have any suggestion for breeds? He has a nice fenced in back yard, and a big house to roam around.

Here is my outfit for day 3! I used one of my dresses as a skirt, and it worked out really well! You can't even tell it is really a dress. Sorry for the lighting, it was raining outside so I was only able to get one good picture outside. 


I also wan't to show you this great hair tutorial! It's a perfect look for summer! I'm definitely gonna try it out! If it works I'll post pictures :)


I hope you all had an amazing 4th of July, filled with fireworks and good food!


Wednesday, June 22, 2011

DIY Glitter Cupcake Stand

Here is a fabulous DIY Cupcake Stand! I got if off of the website thesweetestoccasion.com (One of my favorite websites!) and couldn't resist sharing it with you! Here is a Link to the original post. 


Supplies -Round small wooden box
Wood candle stick
Fine glitter
Wood glue (like Gorilla Glue)
Craft glue
Separate the wood box pieces. We will just be using the lid. The wood candlestick I found had a metal insert for the candle. I couldn’t get mine out so I pushed it in with a screwdriver (you won’t see it later, anyways.) I also sanded the top of the candlestick flat. Test this by setting the box lid on top to see if it sits straight.
Run a bead of  wood glue around the top of the candlestick and place upside down, centered, on the underside of the lid. Let dry completely according to glue’s directions.
Now comes the messy part. Get a large baking sheet or dish and set the cakestand inside.
Using a brush, cover a small portion of the candlestick with glue and sprinkle with glitter.
Repeat until the whole stand is covered. Let dry and repeat on any thinner coverage areas until you are sufficiently sparkly.
This would be gorgeous if you did the glitter in an ombre. For ombre, after a full coat of glitter, recover the bottom with a second color, blending as you go up. This baby is perfect for desserts in wrappers, as it is not food safe – but it sure is cute!
{Photos by Hank + Hunt.}


Monday, June 20, 2011

Meow Monday/Floral Halo Tutorial

Hey all! Thanks for the amazing feedback! I was out of town all weekend for a wedding, and it was nice to come home and see all the love.

This Meow Monday has my cat Phoebe sitting..well.. awkwardly. I'm not quite sure how this is comfy, but she must have liked it!


Here is an awesome tutorial I found on honestlywtf.com. The link to this article is Here!
It is super easy to make, and headbands and halo's are definitely in right now! Enjoy!


You’ll need:
- 2 pieces of 16 or 18 gauge floral cloth wire
- a piece of 4 x 4″ green felt
- a glue gun
- a pair of scissors
You’ll start by cutting 2 circles from the piece of felt at approximately 2″ in diameter. Form the wires of your halo by molding and bending each piece into a half circle. Lay the two half circles opposite of each other to create a single circle, laying it over the top of your head to check the fit. Wrap floral tape over 2 sections of overlapping wire at 11 o’clock and 3 o’clock. Trim any overlapping pieces with the wire cutters. (Click images to enlarge)
Using the wire cutters, cut the stem off the flower making sure the back is flat. Glue one of the felt circles to the back of the flower. Lay the 3 o’clock section of the halo on the backside of the flower. Sandwich the halo between the flower and the second felt circle with plenty of glue. As your pressing the two felt circles together, pull the halo up on its side, making it stand perpendicular to the back of the flower. Insert glue into any openings, making sure the two felt circles are sealed together.
The possibilities are endless with this as you can wrap flowers around half or the entire perimeter of the halo, reinforcing with glue. Or if wearing a halo just isn’t your thing, make a hair pin or brooch by gluing a large bobby pin or a pin back to the back of the first felt cutout.
Your flower halo is ready to wear!
(images by Honestly...wtf)